Guide Links
Step 1: Make a Google Account
Step 2: Create a Project
Step 3: Set up a Billing Account
Step 4: Add Billing to your Project
Step 5: Add Users to your Project
Step 6: Adding APIs to your project
Step 7: Getting your API Key
What’s an “API Key”?
An “API Key” will allow your website to communicate with external services like Google Maps,
Google Drive, YouTube and more. This key, will allow the service you’re trying to use to know
that it’s your website trying to access their API and lets them decide what information (if any)
should be sent back to your website.
As an example, it’s like multiple people having keys to the same building, if you have a key,
then you’re allowed in, but only to the rooms to which your key fits, if you don’t have a working
key, then you won't even make it through the front door.
Why do I need a Google API Key?
Google is one of the most popular API services for websites, it allows access to a wide variety of
services. One of the most popular APIs, is Google Maps, which is integrated into many websites and
will allow customers to find them more easily, get directions to their address, and even get a
street side view of the premises.
Guide: Setting up a Project and getting an API Key
Step 1: Make a Google Account
If you already have an account, login and proceed to the next step.
You can create a Google account by heading to their sign up page. Proceed by following the on-screen instructions.
NOTE: You will need to verify a phone number to prove that you’re human.
Once you’ve created your account, you should see the words “Welcome, [Your Name]”. Another way to ensure you’re
logged in is that you should see a circle with one of your initials in the top right corner of the page, if you
click that, it should display your name and email address.
Step 2: Create a Project
To get started visit the Google Console project creation page.
When you’re prompted, enter a “Project Name”. We would recommend using something memorable like your website name.
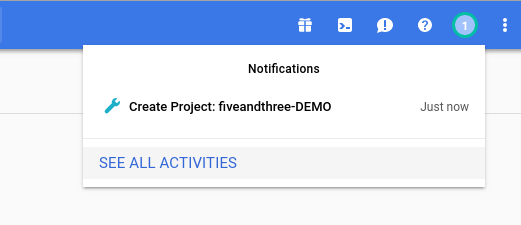
After you’ve entered the required information, click “Create” and you should be redirected to a dashboard. If you
keep an eye on the top right corner of your screen, you should eventually see a notification.
Open the notification and click on the feed-item that says “Create Project: Your project”, this will open your
project in the dashboard.

To ensure your project has been selected properly, in the blue bar (at the top of your screen) you should see your
project name next to the words “Google Cloud Platform”. (Image Example Below)

Step 3: Set up a Billing Account
If you already have a billing account, you can skip to the next step.
Navigate to the billing page, click the button that says “Add billing account”
and follow the on-screen instructions.

NOTE: A billing account is now required
to use Google's API services. Google provides $200 free credit each month making this the equivalent of the
“free” plan they used to offer.
Step 4: Add Billing to your Project
Once you’ve created your billing account, you’ll need to link it to your project. To do this, go to the project
billing page (different to the billing page) where you should
be able to see the project you created in step 2.
Click on the three small dots next to that project and select “Change Billing Account”. This will link your billing
account with your project.

Step 5: Add Users to your Project.
If you need to provide access to someone else (like 5and3) this step is required.
To enable users to access your account navigate to the “IAM & admin” (user management) page. You should see a page
similar to the image below, click the blue “Add” button, to add users to your account.
When prompted, you should enter the email of the members you would like to add and issue them a “Project” role
(In 5and3’s case, you will be provided an email address that you will need to add with the “project” role “owner”,
this allows us to manage your project).

Step 6: Adding APIs to your project.
API’s can be added to your project via the API Library.
To add APIs such as Google Maps or YouTube, you can use the search facility in the library to look for the API that you need.
When you’ve found the API that you want to use, select the card by clicking on it, you should find yourself redirected
to its page, and you should be able to click “Enable”, which will activate the API for your project.

NOTE: You should only need your one API key to use all of Google Cloud Platform APIs, just ensure that the service
you’re trying to use, is enabled under your project.
Step 7: Getting your API Key.
Head over to the API Credentials page and click “Create Credentials”,
when the dropdown shows, select “API”.
You will see a popup which will provide you with your API Key, this will be the only API key you need.

NOTE: If you’d like to access APIs within Google, ensure you have added APIs in the previous step, if they’re not
enabled, you will not be able to use them.
Need Help?
If you need help getting started or would like a professional development team to manage your website, we’re the
team for you!
We can help – get in touch!